


This is a tutorial that will show you how to make a reflective signature. Of course you can use it to make reflections that are not signatures.
Here are your supplies to complete it the way I did. You will need the Arial Round Bold Font and the 3 tiny angel babies in psp. form. Here they are in zip form:Supplies
Ok first open up a new image 400 x 250 white background.

Write your name between size 36 and 48 depending on the length of your name. Use Arial Round Bold Font. Use a lighter color fill and a darker shade of the fill color for your stroke.

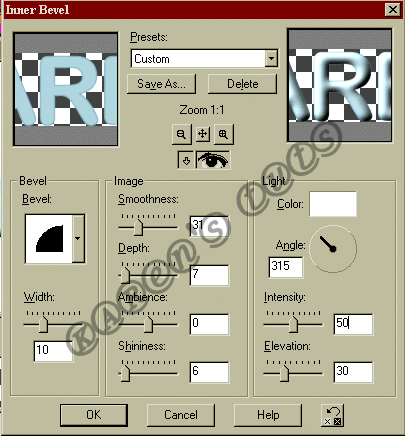
Click selections-select all. Now use your magic wand to highlight the name. You will have what looks like marching ants around the name. Click effects-3d effects-inner bevel. Use the settings illustrated here:
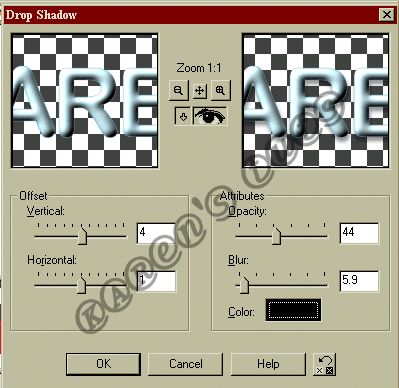
Click selections-select none Now your signature should look like this: Click effects-3d effects-drop shadow. Use the settings as illustrated here:
Now your sig should look like this:
Ok pay attention! LOL Making sure the name layer is highlighted on the layer palette Click edit-copy, Then edit-paste-as a new layer. Got it? Click image-flip. Line up the flipped layer like this:
Click effects-blur-gassian blur at a radius of 3.00. Go to the layer palette and on the layer you are using with the flipped name slide the rule that says 100 to 30. That lowers the transparency. It should look like this now:
Now highlight the original name layer by clicking on it. You should still have it on your clipboard, so Click edit-paste-paste as a new layer. It should be in the back of the original name (IMPORTANT) Like this:
Now Click colors-adjust-brightness/contrast. Use a -255 setting that should make the name completely black.Like this:
Add your baby angels(or other graphics)in the way you choose. Like this:





 Using your side toolbar use your deformation tool with your mouse on the top middle tiny box on the deformation pull down to about 1/3 of the orignal size. Now on the bottom middle tiny box pull about 45 degrees to the left. It should be on a slant then place it like this(adjust as you want)


 Here is how it should look when you are through.

I hoped you enjoyed this tutorial, I enjoyed making it.
"); coffeeWin.document.write("Main"); coffeeWin.document.write("
"); coffeeWin.document.write("MSN Group"); coffeeWin.document.write("
"); coffeeWin.document.write("Tutorials"); coffeeWin.document.write("
"); coffeeWin.document.write("Signatures"); coffeeWin.document.write("
"); coffeeWin.document.write(""); coffeeWin.document.write("
"); coffeeWin.document.write(""); coffeeWin.document.write("